Try Holos Locally
This guide walks through the process of building and managing a software development platform with Holos. The k3d platform built in this guide is a slimmed down version of the larger, more holistic, Holos reference platform.
Holos is different from existing tools in a few important ways.
- Holos provides a unified configuration model purpose built to improve on unmodified Helm charts, Kustomize bases, or anything else that produces structured configuration data.
- Holos all but eliminates the need to template yaml, a common source of frustration and errors in production.
- Holos platforms are composable and have breadth. The toolchain and techniques scale down to one machine and up to multiple clusters across multiple regions.
- The unified configuration model is well suited to a Zero Trust security model. Platform wide policy configuration is easier to manage with Holos.
This guide assumes commands are run locally. Capitalized terms have specific definitions described in the Glossary.
What you'll need
You'll need the following tools installed to complete this guide.
- holos - to build the platform.
- helm - to render Holos components that wrap upstream Helm charts.
- k3d - to provide a k8s api server.
- OrbStack or Docker - to use k3d.
- kubectl - to interact with the k8s api server.
- mkcert - to make trusted TLS certificates.
- jq - to fiddle with JSON output.
Registering an account is recommended to try out proper authentication and authorization in Holos, but you can complete this guide without signing up.
Goal
By the end of this guide you'll have built the foundation of a software development platform. The foundation provides Zero Trust security by holistically integrating off-the-shelf open source software.
- Istio is configured to authenticate and authorize requests using an OIDC ID-Token issued by ZITADEL before requests reach backend services.
- The platform provides single sign-on and role based access control for all services running on the platform.
This guide strives to keep things neat and tidy. All of the resources are located in one k3d cluster and one local Git repository. If you want to clean up at any point, do so with:
k3d cluster delete workload
rm -rf holos-k3d
Sign In or Out
Holos provides integrated authentication and authorization which we'll use in this guide to protect a service. We recommend registering an account to see this in action. Registration also enables you to explore the customizable web form that simplifies complex configuration.
If you opt-out, the platform will be configured to use a fake identity in place of real id tokens.
- Sign In
- Opt Out
holos register user
holos logout
Create the Platform
A server-side platform resource in Holos stores the web form used to simplify platform wide configuration.
First, initialize an empty Git repository:
mkdir holos-k3d
cd holos-k3d
git init
- Signed In
- Signed Out
Use holos to make the rpc call to create the server-side platform
resource.
holos create platform --name k3d --display-name "Try Holos Locally"
Create a blank platform.metadata.json file so subsequent holos commands
skip rpc calls.
touch platform.metadata.json
Generate the Platform
Generate the platform code in the repository root.
holos generate platform k3d
Commit the generated platform config to the repository.
git add .
git commit -m "holos generate platform k3d - $(holos --version)"
Push the Platform Form
Each Holos platform has a Platform Form used to submit top level, platform-wide configuration values. The purpose of the form is to validate configuration values and simplify complicated configurations and integrations.
- Signed In
- Signed Out
Push the Platform Form to publish it. Browse to the printed URL to view the form.
holos push platform form .
You will update the Platform Model locally in a later step so there's nothing to do in this step. Only signed-in users can push a Platform Form to the Holos web server.
# holos push platform form .
The Platform Form is defined locally in forms/platform/platform-form.cue.
On the web it looks like:
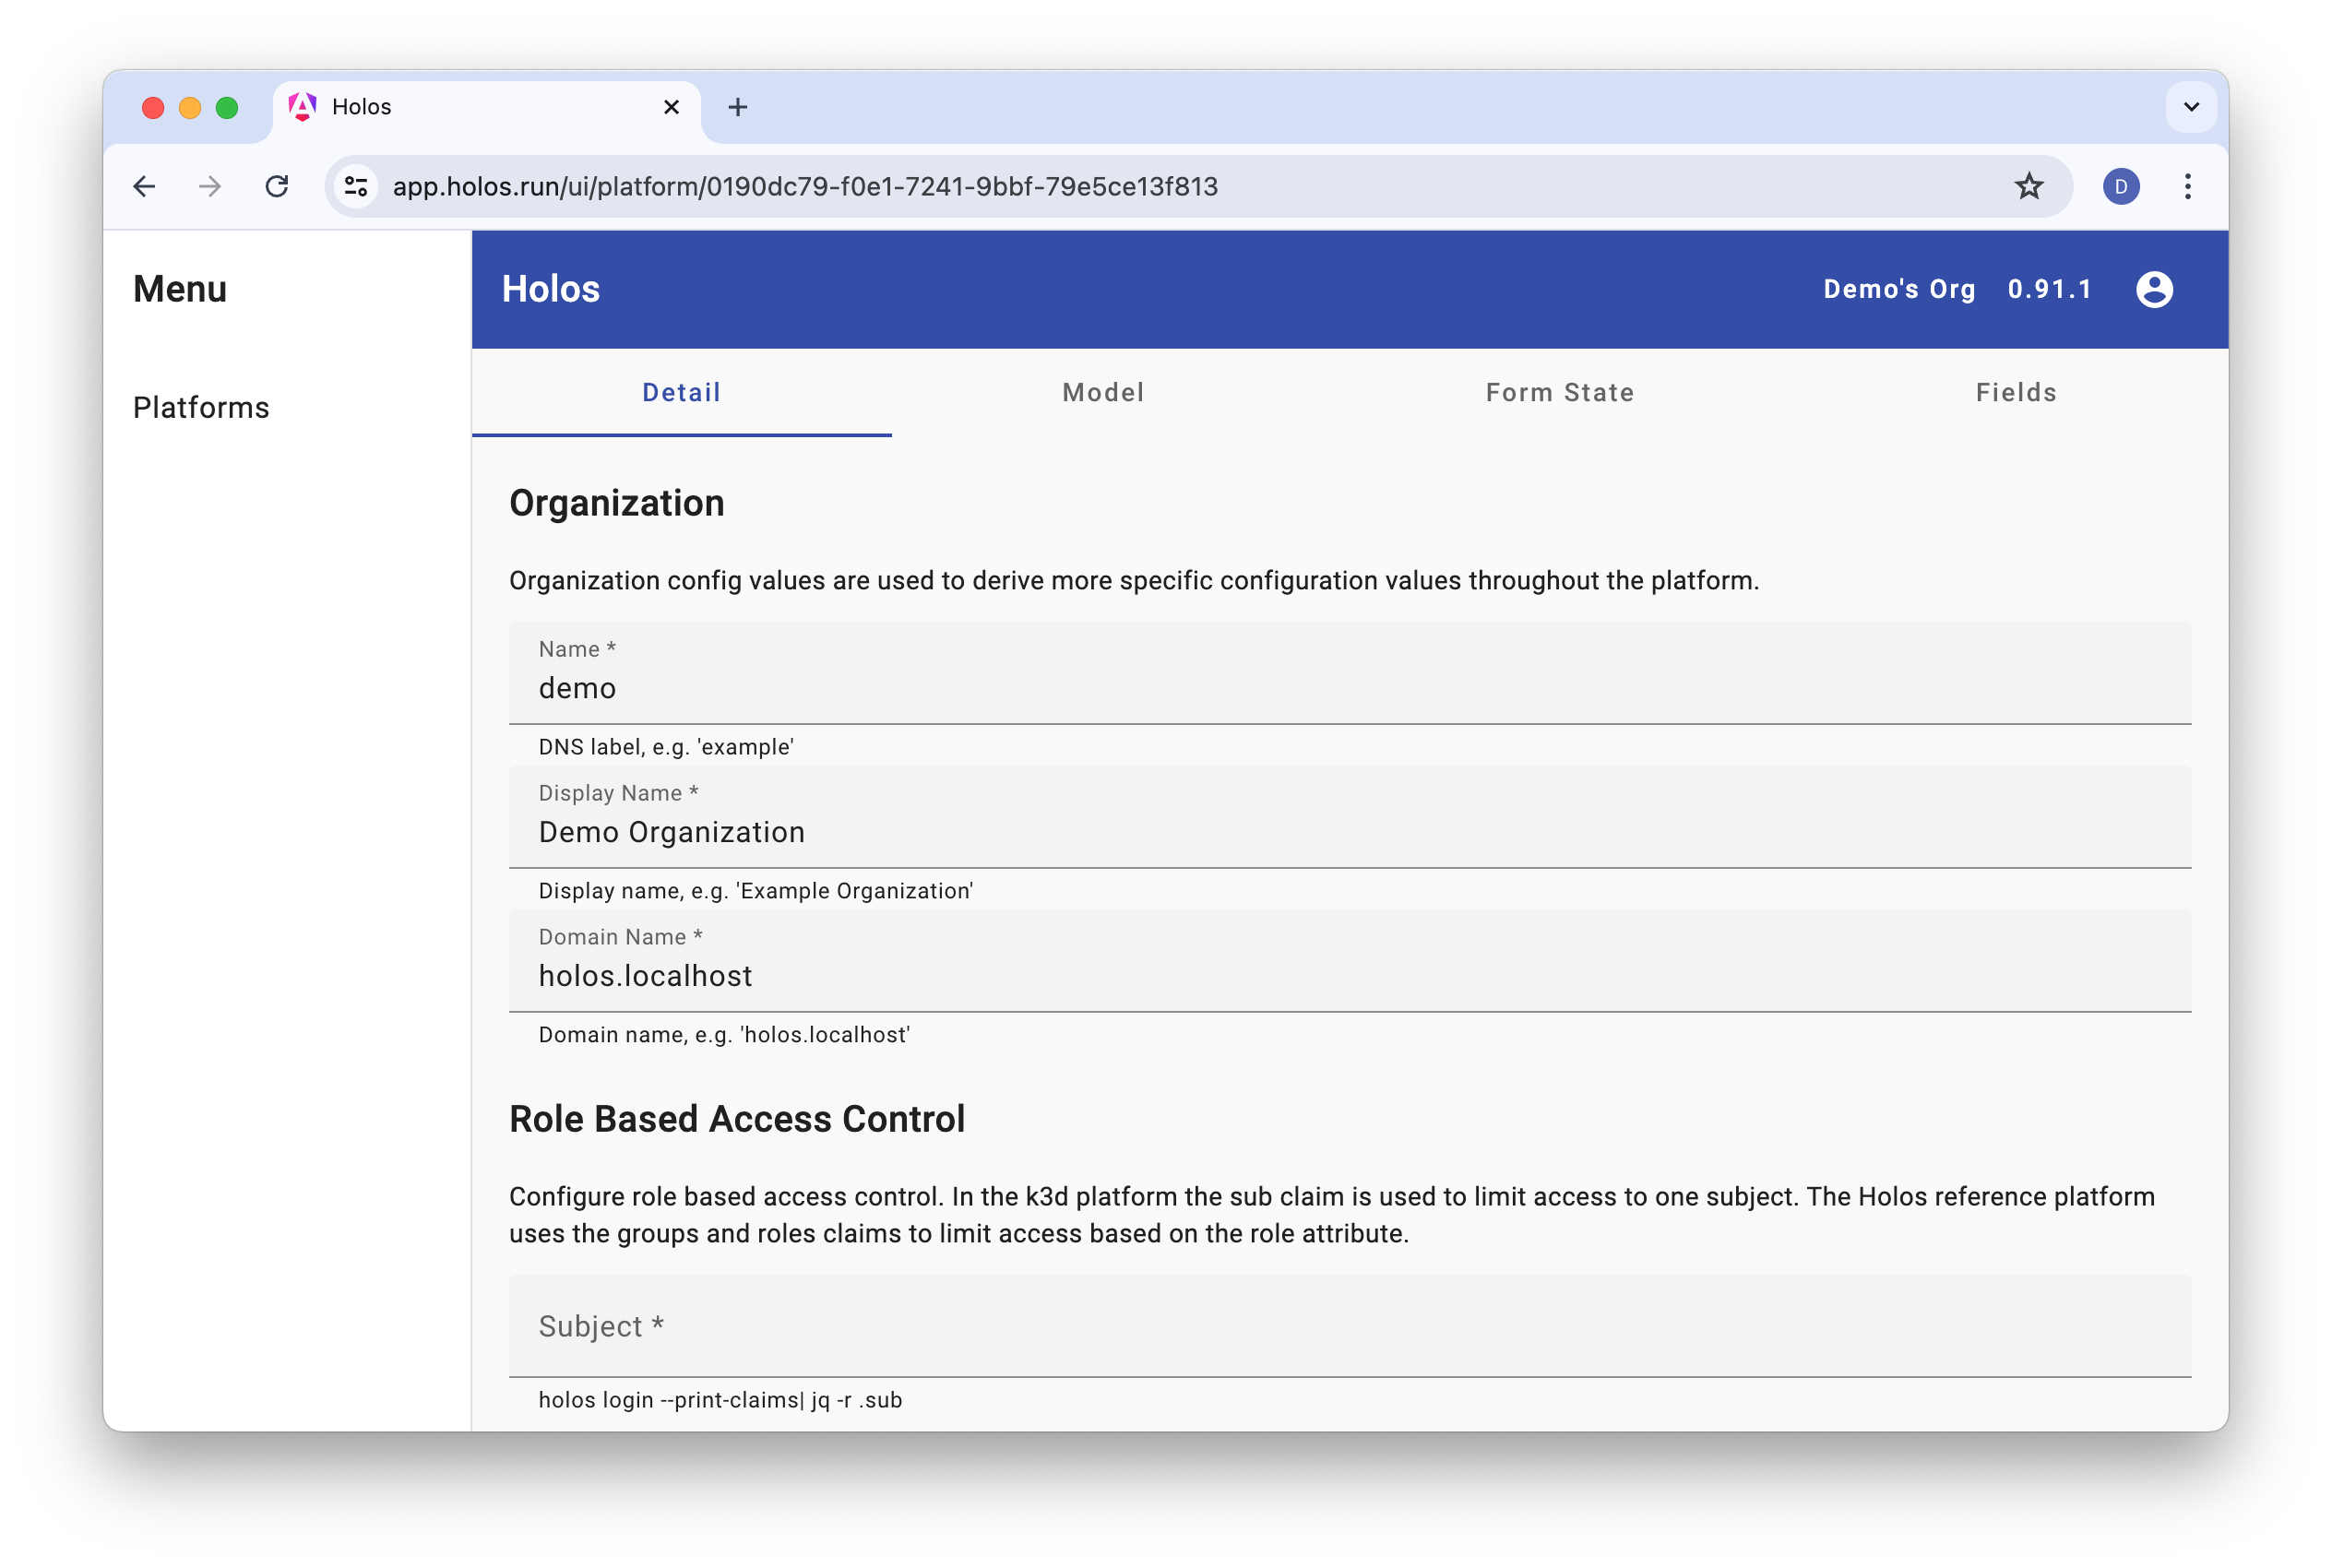
Update the Platform Model
Holos needs initial, top level configuration values to render the platform. The Platform Model is the term we use for these values. In this section you will configure role based access control by way of updating the Platform Model.
In the k3d platform you're building now, role based access control is
implemented by asserting against the oidc id token subject. Update the form
with the sub claim value from your id token. This will ensure only you have
access to platform services.
- Signed In
- Signed Out
Copy and paste the sub value into your Platform Form's Subject field.
holos login --print-claims --log-level=error | jq -r .sub
After pasting the sub value, click Submit on the form.
You don't have an id token when you're signed out, so there's nothing for you to do in this step.
# holos login --print-claims --log-level=error | jq -r .sub
The platform will be configured to assert against the User-Agent header instead.
Pull the Platform Model
The Platform Model needs to be pulled into the local Git repository after the
form has been submitted. Next, we'll run holos render which operates
exclusively on local files.
Holos stores the Platform Model in the platform.config.json file. Holos
provides this file as input to CUE when rendering the platform. This file is
intended to be added to version control.
- Signed In
- Signed Out
Pull the updated Platform Model into the local repository.
holos pull platform model .
git add platform.config.json
git commit -m "Add platform model"
The holos generate platform k3d command created an initial Platform Model in
platform.config.json. As a result there's nothing to do in this step.
# holos pull platform model .
# git add platform.config.json
# git commit -m "Add platform model"
Render the Platform
Holos has everything necessary to render the platform once the
platform.config.json file and the code from holos generate are in the
current directory.
Rendering a platform is the process of iterating over each platform component and rendering it into plain yaml. Holos does not apply the resulting manifests. Other tools like kubectl, ArgoCD, or Flux are responsible for applying the manifests.
holos render platform ./platform
The render command writes the manifest files to the deploy/ directory. Commit
the files so they can be applied via GitOps later.
git add deploy
git commit -m "holos render platform ./platform"
It usually takes no more than a few seconds.
Rendering the holos reference platform currently results in about 500K lines of yaml. In contrast, roughly 80K lines are produced by this slimmed down k3d platform.
We mention this because the scale doesn't matter as much as it does with other tools. Manage millions of lines of configuration with Holos the same way this guide manages thousands. This is made possible by the unique way CUE unifies all configuration into one single model.
Configure DNS
Configure your machine to resolve *.holos.localhost to your loopback
interface. This is necessary for requests to reach the workload cluster.
- macOS
- Linux
- Windows
Cache sudo credentials.
Admin access is necessary to setup a local dnsmasq instance and configure macOS's DNS resolver.
sudo -v
Resolve *.holos.localhost DNS queries to 127.0.0.1.
bash ./scripts/local-dns
NSS-myhostname ships with many Linux distributions and should resolve *.localhost automatically to 127.0.0.1.
Otherwise it is installable with:
sudo apt install libnss-myhostname
Ensure the loopback interface has at least the following names in C:\windows\system32\drivers\etc\hosts
127.0.0.1 httpbin.holos.localhost app.holos.localhost
Create the Cluster
The Workload Cluster is where your applications and services will be deployed. In production this is usually an EKS, GKE, or AKS cluster.
Holos supports all compliant Kubernetes clusters. Holos was developed and tested on GKE, EKS, Talos, k3s, and Kubeadm clusters.
- Try Holos
- Develop Holos
Use this command when exploring Holos.
k3d cluster create workload \
  --port "443:443@loadbalancer" \
  --k3s-arg "--disable=traefik@server:0"
Use this command when developing Holos.
k3d registry create registry.holos.localhost --port 5100
k3d cluster create workload \
  --registry-use k3d-registry.holos.localhost:5100 \
  --port "443:443@loadbalancer" \
  --k3s-arg "--disable=traefik@server:0"
Traefik is disabled because Istio provides the same functionality.
Apply the Platform Components
Use kubectl to apply each platform component. In production, it's common to
fully automate this process with ArgoCD, but we use kubectl to the same
effect.
Local CA
Holos platforms use cert manager to issue tls certificates. The browser and tools we're using need to trust these certificates to work together.
Admin access is necessary for mkcert to manage the certificate into your trust
stores.
sudo -v
Manage the local CA and copy the CA key to the workload cluster so that cert manager can manage trusted certificates.
bash ./scripts/local-ca
Take care to run the local-ca script each time you create the workload cluster so that Certificates are issued correctly.
Service Mesh
The platform service mesh provides an ingress gateway and connectivity useful for observability, reliability, and security.
Namespaces
With Holos, components are automatically added to the namespaces component, useful for centrally managed policies.
kubectl apply --server-side=true -f ./deploy/clusters/workload/components/namespaces
Custom Resource Definitions
kubectl apply --server-side=true -f ./deploy/clusters/workload/components/gateway-api
kubectl apply --server-side=true -f ./deploy/clusters/workload/components/istio-base
Cert Manager
Apply the cert-manager controller.
kubectl apply --server-side=true -f ./deploy/clusters/workload/components/cert-manager
Apply the ClusterIssuer which issues Certificate resources using the local certificate authority.
kubectl -n cert-manager wait pod -l app.kubernetes.io/component=webhook --for=condition=Ready
kubectl apply --server-side=true -f deploy/clusters/workload/components/local-ca
kubectl apply --server-side=true -f deploy/clusters/workload/components/certificates
kubectl -n istio-gateways wait certificate httpbin.holos.localhost --for=condition=Ready
The certificate will time out before becoming ready if the local-ca script was not run after the cluster was created.
Istio
Istio implements the Service Mesh.
kubectl apply --server-side=true -f ./deploy/clusters/workload/components/istio-cni
kubectl apply --server-side=true -f ./deploy/clusters/workload/components/istiod
kubectl apply --server-side=true -f ./deploy/clusters/workload/components/gateway
Verify the Gateway is programmed and the listeners have been accepted:
kubectl -n istio-gateways wait gateway default --for=condition=Accepted
httpbin
httpbin is a simple backend service useful for end-to-end testing.
kubectl apply --server-side=true -f deploy/clusters/workload/components/httpbin-backend
kubectl apply --server-side=true -f deploy/clusters/workload/components/httpbin-routes
kubectl -n holos-system wait pod -l app.kubernetes.io/instance=httpbin --for=condition=Ready
Browse to https://httpbin.holos.localhost/ to verify end to end connectivity. You should see the httpbin index page.
Authenticating Proxy
The auth proxy is responsible for authenticating browser requests, handling the oidc authentication flow, and providing a signed id token to the rest of the services in the mesh.
Cookie Secret
The auth proxy stores session information in an encrypted cookie. Generate a random cookie encryption Secret and apply.
LC_ALL=C tr -dc A-Za-z0-9 </dev/urandom \
  | head -c 32 \
  | kubectl create secret generic "authproxy" \
    --from-file=cookiesecret=/dev/stdin \
    --dry-run=client -o yaml \
  | kubectl apply -n istio-gateways -f-
Deployment
The auth proxy Deployment receives requests from web browsers and responds with an authentication decision.
kubectl apply --server-side=true -f deploy/clusters/workload/components/authproxy
kubectl apply --server-side=true -f deploy/clusters/workload/components/authroutes
- Signed In
- Signed Out
Verify authentication is working by browsing to https://httpbin.holos.localhost/holos/authproxy.
We want a simple Authenticated response.
You may need to refresh the page a few times while the platform configures itself.
Istio will respond with no healthy upstream until the pod becomes ready.
Wait for the pod to become ready with:
kubectl -n holos-system wait pod -l app.kubernetes.io/instance=httpbin --for=condition=Ready
Once authenticated, visit https://httpbin.holos.localhost/holos/authproxy/userinfo which returns a subset of claims from your id token.
If you get Unauthorized instead of a json response body, make sure you
authenticated first.
{
  "user": "275552236589843464",
  "email": "demo@holos.run",
  "preferredUsername": "demo"
}
The auth proxy will always try to sign you in when you are signed out, so there isn't much to do here. Please do take a moment to glance at the Signed In tab to see how this would work if you were signed in.
The k3d platform relies on https://login.holos.run to issue id tokens.
Authorization has been configured against fake request headers instead of
the real x-oidc-id-token header.
Authorization Policy
Configure authorization policies using attributes of the authenticated request.
Authorization policies route web requests through the auth proxy and then
validate all requests against the x-oidc-id-token header.
kubectl apply --server-side=true -f deploy/clusters/workload/components/authpolicy
Istio make take a few seconds to program the Gateway with the AuthorizationPolicy resources.
Try out Zero Trust
A basic Zero Trust security model is now in place. The platform authenticates and authorizes requests before they reach the backend service.
Browser
- Signed In
- Signed Out
The platform has been configured to authorize requests with a x-oidc-id-token header.
- Verify authentication is working by browsing to https://httpbin.holos.localhost/dump/request.
- Refresh the page a few times.
- The
httpbinbackend pods should echo back thex-oidc-id-tokenheader injected by the auth proxy.
- Note the
x-oidc-id-tokenheader is not sent by your browser but is received by the backend service.- This design reduces the risk of exposing id tokens in the browser.
- Browser request size remains constant as more claims are added to id tokens.
- Reliability improves because id tokens often overflow request header buffers when they pass through middle boxes across the internet.
The platform has been configured to authorize requests with a User-Agent: anonymous header.
- Open an incognito window (Cmd+Shift+N) to verify the platform is enforcing the authorization policy.
- Browse to
https://httpbin.holos.localhost/dump/request
you should be redirected to the sign in page by the auth proxy.
- You do not need to register or sign in.
- This step verifies the platform is redirecting unauthenticated requests to the identity provider.
- Navigate back or close and re-open an incognito window.
- Set your
User-Agentheader toanonymoususing your browser developer tools.- For Chrome the process is described here.
- The purpose is to simulate an authenticated request.
- Browse to
https://httpbin.holos.localhost/dump/request.
- The platform should allow the request through to the backend pod.
httpbinshould echo back your request which should containUser-Agent: anonymous.
Command Line
Verify unauthenticated requests are blocked by default outside the browser.
curl -I https://httpbin.holos.localhost/dump/request
You should receive a HTTP/2 302 response that redirects to location: https://login.holos.run to start the oauth login flow.
Next, verify authenticated requests are allowed.
- Signed In
- Signed Out
The platform is configured to authenticate the id token present in the
x-oidc-id-token header.
💡 It also works with grpcurl.
curl -H x-oidc-id-token:$(holos token) https://httpbin.holos.localhost/dump/request
The platform is configured to authorize any request with User-Agent: anonymous in place of validating the oidc id token.
💡 Take a moment to click the Signed In tab, I don't want you to miss how
cool $(holos token) is.
curl -A anonymous https://httpbin.holos.localhost/dump/request
You should receive a response showing the request headers the backend received.
Note how the platform secures both web browser and command line api access to the backend httpbin service. httpbin itself has no authentication or authorization functionality.
Summary
Thank you for taking the time to try out Holos. In this guide, you built the foundation of a software development platform that:
- Provides a unified configuration model with CUE that
- Supports unmodified Helm Charts, Kustomize Kustomizations, plain YAML.
- Provides a web form to pass top level parameters.
- Reduces errors by eliminating the need to template unstructured text.
- Is composable and scales down to a local machine.
- Provides an way to safely configure broad authentication and authorization policy.
Next Steps
Dive deeper with the following resources that build on the foundation you have now.
- Explore the Rendering Process in Holos.
- Dive deeper into the Platform Manifests rendered in this guide.
- Deploy ArgoCD onto the foundation you built.
- Deploy Backstage as a portal to the integrated platform components.
Clean-Up
If you'd like to clean up the resources you created in this guide, remove them with:
k3d cluster delete workload
rm -rf holos-k3d